
Healthy Homework
by Andy Dappen
“Why are you always up so late before a tour?” she asks me. “You need more sleep!”
I think my wife is out to get me because, if she really wanted me healthy, she wouldn’t discourage my pre-trip homework. Studies of avalanche and mountaineering accidents indicate that most mishaps – getting caught in avalanches, finding yourself lost, being benighted, contracting hypothermia, even skiing into trees — can be avoided through good pre-trip planning. You’ll enjoy much safer trips by observing the following:
Weather and Avalanche Reports. Rather than choosing place first and conditions second, do it the other way around. A few days before a tour, use the predicted weather and the current avalanche report to pick a safe location. After studying both reports it’s easy to decide if you should seek sheltered forests or can venture into the alpine, stick to ridges or carve bowls, ski gentle lines or hit something steep, look for north-facing powder or something consolidated by sun. The evening before a tour recheck the reports – are there reasons to tweak, recalibrate, or abort plans?
 Partners. Consider the company you’ll be keeping next. A group of fit, capable skiers can justify very different objectives than one with some weak links. You’ll only succeed at what your weakest links can accomplish, so forget about hoping otherwise — tailor the tour so it doesn’t destroy or demoralize weaker teammates. Strong skiers can practice patience, do some extra laps when appropriate, or split off to tag additional objectives along the way. Dividing the group, however, creates coordination and communication problems, so plan accordingly (below).
Information. With possible routes in mind, gather intel from friends, Internet forums, websites, guidebooks, or articles. What else can you learn about current conditions, cruxes, and complications? Create strategies for contending with possible difficulties.
Mapping and Map Study. Draw the primary and contingency routes you are considering on a 7.5-minute topographic map. Study your lines closely. Where are the danger zones, terrain traps, 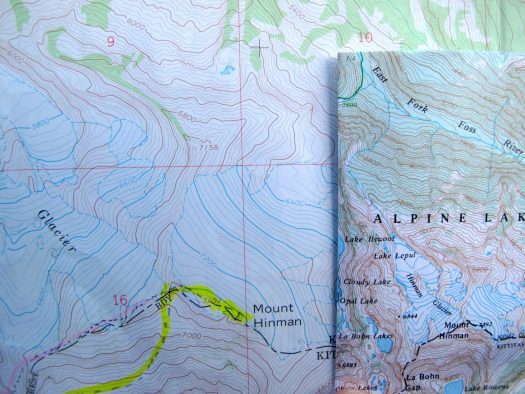 cornices, avalanche starting zones…? Can you avoid these hazards by traversing lower, climbing sooner, following a different drainage, sticking to a ridge, or using the shelter of a forest? CalTopo (www.caltopo.com) is a particularly useful mapping tool for this. Pull up the appropriate map (use the search box), turn on the ‘Slope Angle Shading,’ and draw in your route. You’ll see how small tweaks in your line result in big improvements in avoiding dangerous slope angles. Add waypoints in tricky areas where a little creative weaving will keep you on safer ground. Also use the ‘Aerial Imagery’ layer to study aerial photos of the ground, vegetation, and forests along your route. This provides insights into how well anchored the snow may be on certain slopes and how navigable the forests may be along the way. Again, place waypoints noting safe zones or open forests that will facilitate efficient travel rather than frustrating bushwhacking.
Time. The map allows you to estimate the time needed for the tour. For the average weekend skier, allow one hour per 1,000 feet of vertical gain. Where the route is flat or gains elevation slowly (e.g., meadows or roads) use distance instead, figuring the average skier travels two miles per hour. Pay attention to your own tours and you’ll quickly quantify your pace – young, fit skiers may be 50 percent faster, gaining 1,500 vertical feet per hour and traveling flatter ground at three miles per hour. Coming down, the average group with mixed abilities will require about a third of the ascent time to descend. Fast groups composed entirely of strong skiers will use about a quarter of their ascent time to descend. Don’t forget stoppage time – allow ten minutes per skin transition, five minutes per hour for breaks and clothing changes, and 30 minutes for lunch. And don’t forget about snow conditions – if you’ll be breaking a foot of new snow you may be 20 percent slower, maybe even 50 percent slower if breaking two feet of snow. The total of all these parts paints an accurate picture of the total time needed and the hour of morning the group should meet.
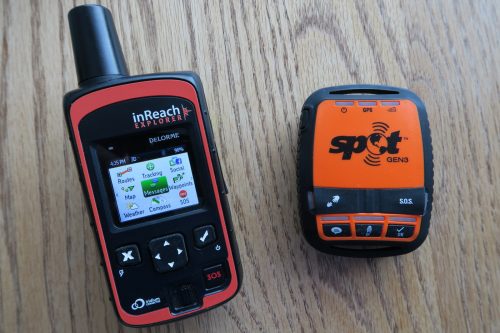
GPS. Load your map, waypoints and routes into your smartphone or GPS. Print and pack a paper map as well – electronics WILL occasionally fail.
 Communication Plan. Mild confusion, moderate delays, dangerous wanderings, and actual accidents all result from poor group communication. Communication issues vary according to the trip but they are predictable and can be prepared
 for. Good communication starts at home by getting everyone on the same page about the objective, its difficulty, the expected conditions, the gear needed, the meeting time, the return time, and more. Discuss a travel style everyone can agree to that will keep the group together, moving efficiently, and working as a team. A shared Google Document or an on-going email string are both good tools for this. Also, plan for anticipated communication challenges during the actual tour. If the group will be widely spaced while ascending or descending avalanche terrain, how will the head and tail of the team stay in touch? If the group wants to divide to tackle different objectives, what problems could arise and how will the subgroups communicate? These are solvable issues but require a strategy. Sometimes they require extra equipment.
Equipment. This homework provides a clearer picture of the personal gear needed for the tour ahead. Besides the normal ski kit, you’ll know whether to pack ski crampons, technical tools (ice axes, crampons), extra warmth layers, a more powerful headlight, or more food. The same applies to group gear. Besides the staples (first-aid supplies, repair kit, fire makings), the planning will help determine whether to tote additional emergency gear (tarp, stove) or communication aids (walkie-talkies).
Home Instructions. Finally, prepare information for folks at home. Leave details about the primary route and possible contingency plans. List whose car will be used and where it will be parked. Give your expected return time and a time when the cavalry should be called if you’re long overdue.
Yup, all of this may have you losing a little sleep the evening before a tour, but like I tell my wife now, “Better a little sleepy than a lot dead.”
This post was originally published on 2/11/2019.
