
by Ray Birks

Back in the day, before specialized gear and actual knowledge of what we were doing, my friends and I used to “bikepack”. I put this in quotes because what we were doing was strapping any available backpacking gear to our bodies and bikes, then riding somewhere to camp. It was not efficient. It was not practical. It was not bikepacking in its current state. But it sure was fun.
Nowadays, bikepacking or “adventure biking”, the term retailers have coined, is picking up steam as bicyclists probe the wilderness for fitness and a splash of adventure. ‘
“Bike touring” is another term loosely associated with riding long distances and overnight camping along the way. But “touring” is mainly defined as staying on paved routes whereas “bikepacking” implies the use of singletrack trails and backcountry dirt roads.
The appeal of bikepacking for me is threefold. For one, I like the adventure associated with plotting a co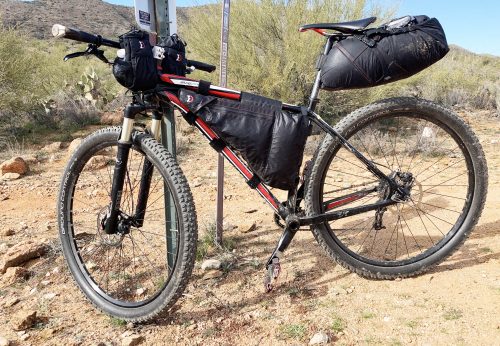 urse to a destination a few days away. Being able to follow maps and use apps like TrailForks are essential skills when packing to new destinations.
Secondly, I appreciate that bikepacking lends itself to wandering. On a recent trip to the Black Canyon in Arizona, we were faced with a decision about a new trail and an eight-mile detour. After mild debate and lackluster hemming and hawing, we took the unplanned route and it offered some of the best riding we experienced. Even though we were a little behind our imaginary schedule, setting up the tent in the dark was worth the quality of trails and vistas.
Bikepacking also lends itself to a slower pace and not just because of the added weight. When I normally ride my mountain bike, I usually have an intended route — I know how long it should take me and I’m fairly certain of how many miles I’m going to ride. Often times I hammer through to get a good workout. Bikepacking slows me down to appreciate the views, check maps, make decisions, and to explore places that pop up along the way.

For the uninitiated, the basic gear you’ll need for an overnight expedition is a bike, a bag system, and camping equipment. Any bike that is suited for gravel roads or trails will get the job done, so if you own a mountain bike, you have a bikepacking bike. Like most outdoor sports, however, there is specialized gear that makes life better. Bikes with fatter tires, like fat bikes or plus-sized tire bikes, give more cushion for long treks. TREK makes a bikepacking oriented bike called the TREK 1120 that has larger tires, integrated rack systems, and a fork with lots of mounts for accessories.
You can specialize your experience as much as you want with the latest and lightest gear. For adventurers who already own a bike but who are looking for some practical bikepacking upgrades, there are many products to choose from. This unique set of handlebars from Surly Bikes, called the Moloko, gives your bike a more relaxed riding stance and also more places to strap gear. A friend showed me a recent addition to his setup which was a super lightweight carbon bar that clamps to the front of his handlebars to give an additional place for a bag, camera, light, or GPS.
 Since my cross-country bike does not include many places for water bottles, especially on the forks, I was introduced to King Cage universal support clamps which allow you to strap a gear cage or water bottle holder to different parts of your bike, like the front fork. I’ve found these to be extremely versatile and handy. In order to utilize these gems on your front fork, you’ll need a cage to hold bags. Salsa Cycles makes an Anything Cage which requires three mounting spots while Blackburn Design makes an Outpost cage with two mounts.
Camping gear is also a necessity and the lighter the better as every added ounce becomes another ounce you’re moving with every pedal stroke. Some riders will carry a bivy sack instead of a tent to save weight. REI has recently introduced five lightweight bikepacking-specific tents with shorter poles for easy packing, gear storage nets, and extreme weight savings (under 2.5 pounds). Any gear you can compress is also handy. Down sleeping bags and jackets are nice for their compressibility. Even the tried-and-true Spork and any bowl or cup that can be flattened out saves you valuable space.
Among the most recent additions you’ll see in most bike shops today are specialized bags helping you to haul gear from site to site. Panniers have long been a bike touring staple, but recently frame bags, seat bags, feed, and handlebar bags are popular and help make gear more accessible and easier to carry.
One thing to think about is whether to pack all gear on your bike or tow a trailer. If you’re capable of packaging all your gear on your bike for a several day trip, this will be the most efficient, lightest solution, especially if you’re going to be on singletrack trails where towing a trailer would make balance and riding a challenge. If you’re on a longer jaunt, are carrying more creature comforts, or your path is relatively flat and nontechnical, then a trailer might be a better solution. Here is a good article that lays out the pros and cons of each style.
A few local spots are great for beginners to get out and experience bikepacking firsthand. The Palouse to Cascades Trail, which spans the width of Washington State, has many entry/exit points and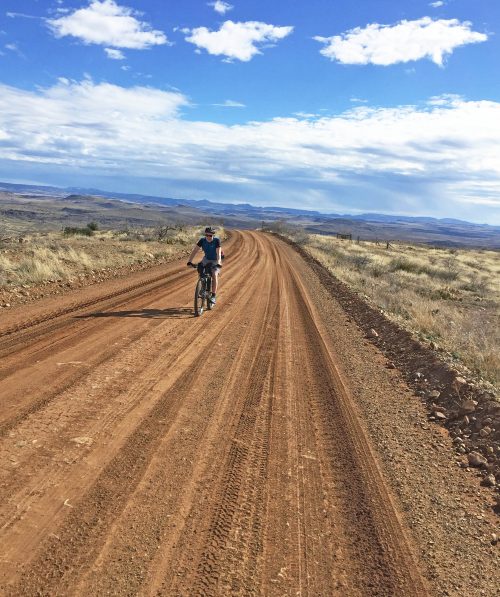 being an old railroad grade is relatively easy pedaling. Just east of Snoqualmie Pass is the Iron Horse State Park, Hyak Trailhead. From here it’s an easy pedal through the 2.2-mile-long Snoqualmie Tunnel (bring a good light) and a gentle 22-mile descent all the way down to Rattlesnake Lake near North Bend. There are primitive campsites along the way that are claimed on a first-come-first-serve basis and where you pay when you
  arrive by dropping payment in the drop box.
Getting dropped off at the top of Blewett Pass and pedaling back to Wenatchee is also a worthy endeavor. From the pass, heading east through Haney Meadows on Liberty/Beehive Road is a great two-day endeavor with camp spots at Ken Wilcox Horse Camp or unofficially at one of many fantastic viewpoints along the Mission Creek drainage.
Another area in a unique setting is Douglas Creek which connects the Waterville Plateau with the Palisades Road. A shuttle would make this an easy ride down but a long trip back to the car. More adventurous souls could take the Link bus to Rock Island, ride Highway 28 to the Rock Island Grade Road, climb up and over the plateau to the Douglas Creek/Slack Canyon entrance, and pedal down to Palisades Road. Add some easy miles on pavement back to Highway 28 and back to Rock Island puts your two-day total mileage at about 50 miles.
A great website that details bikepacking adventures around the world is bikepacking.com. It’s chock full of routes, maps, photos, gear reviews, and inspiration.
A more modern, but slightly less adventurous take, is credit-card bikepacking. As you might infer, this approach uses much less gear but considerably more money. Plotting out a route that hits locales with hotels or Airbnbs is a good introduction to riding long distances with some weight on your bike but without the hassle of a heavier tent, sleeping bag or cooking supplies.
In my opinion, the ultimate goals of any adventure is to have fun, explore new places, expand your limits, and make memories. Bikepacking checks all those boxes. You don’t need any fancy gear, lightweight tents or special bikes, just a thirst for adventure. Oh, and a few reliable maps to get back home too.
This post was originally published on 5/8/19.
You can find Bikepacking: Part Two here, which will include an interview with an experienced bikepacker who has traveled to parts unknown on two wheels. He’ll share his stories, tips, and photos.
