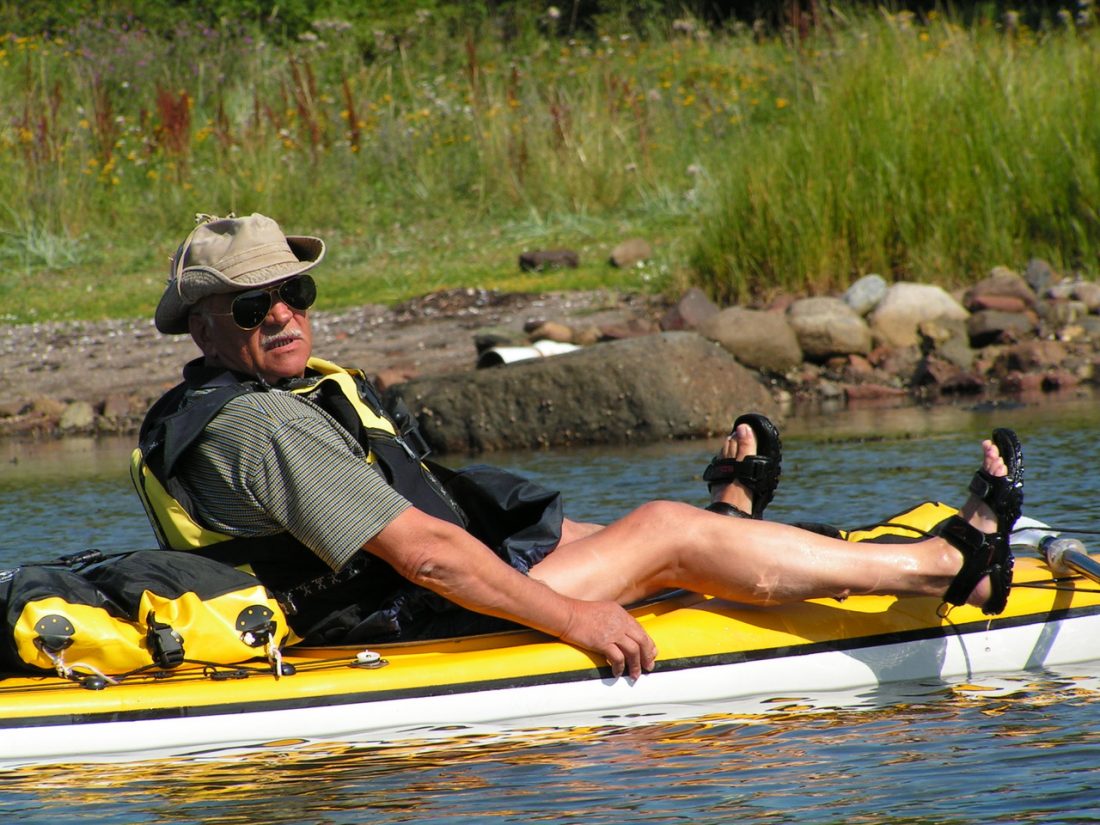

Photo: The Lower Wenatchee, a fun and scenic river for canoeists
Attractions: Rafters and whitewater kayakers consider this stretch of river (also referred to as the Lower Wenatchee) rather tame and are likely to exit the river at Cashmere. For intermediate canoeists, however, Cashmere is a good place to begin your forays on the Wenatchee. It will test you skills while exposing you to beautiful orchard lands. Canoeists with plastic boats will also find this stretch of river runnable well into the late summer.
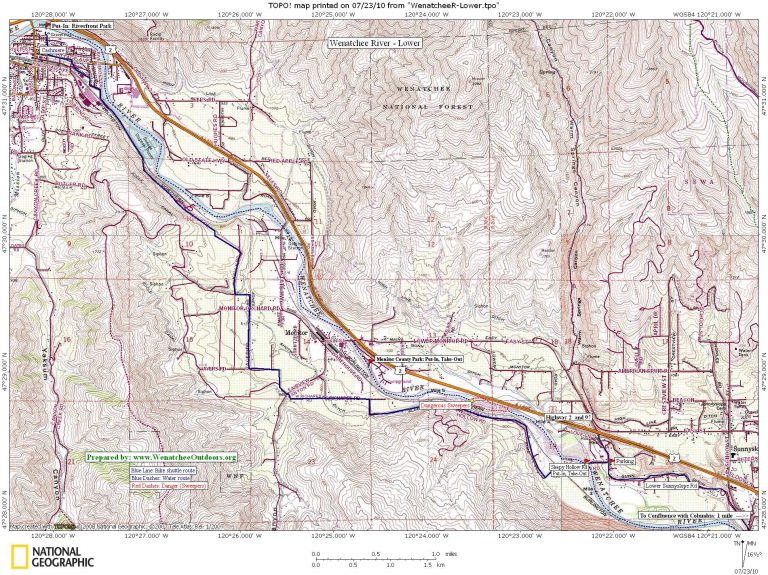
Distance and River Flows: Distance from Cashmere to Wenatchee Confluence State Park is 10.5 miles. Distance from Monitor to Wenatchee Confluence State Park is 6 miles. Recommended river levels are from 1,000 cfs to 5,000 cfs (check the ‘River-Flows’ links under our ‘Conditions’ tab). Below 1,000 cfs there are rocks to avoid and the run gets harder, but the river is still runnable. Above 5,000 cfs expect sharp eddy lines, big waves in places and a potentially long, cold swim. The easiest level is around 2,000 cfs. The river gradient from Cashmere to the highway crossing at Wenatchee is 15 feet per mile.
Best Season. Regardless of the season, it’s a fun paddle. Obviously the risks increase in winter and early spring when the air and water temperatures are much colder.
Skill: 1+ or 2- (advanced beginner or low intermediate). Fitness: 2 (intermediate).
Difficulty. Several rapids on the Lower Wenatchee could be considered Class 2 and, at certain water levels one is arguably a 2+. The rapids at the Cashmere bridge should be considered Class 2 because the bridge pillars obstruct your view of rocks and waves, giving you little time to avoid them.
Hazards. All those normal whitewater things—hypothermia from really cold mountain water if you tip, getting dragged under sweepers, getting pinned to boulders or bridge piers, drowning…All of which means you should know what you’re doing and you must tackle this at your own risk.
Maps. See maps below for more information.

Photo Right: A canoeist who blew it.
Trip Options and Put-Ins:
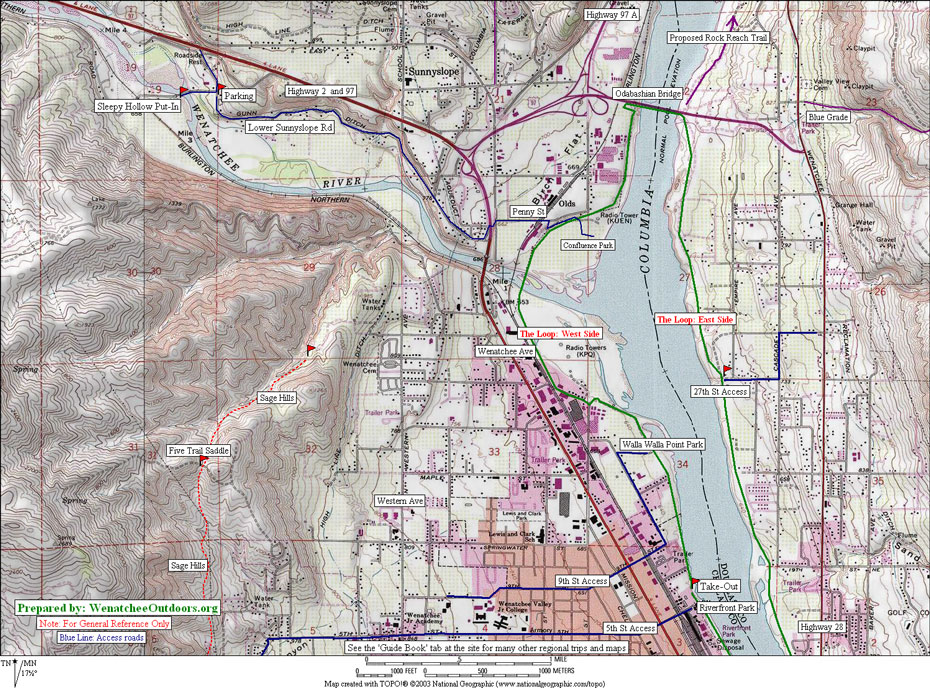
1) The least skilled paddlers should put in at Sleepy Hollow Bridge, closer to Wenatchee. Even the river downstream from Sleepy Hollow can challenge beginners at all but medium flows. 2) Skilled canoeists can put in at Cashmere at Riverside Park, which is where commercial raft trips generally take out. At higher flows expect to do an eddy turn immediately. At low water you may need to carry fifty yards downstream. An alternative put-in is on river right about a half a mile below Cashmere’s easternmost bridge. Access this put-in from Riverfront Drive. 3) For additional put-ins, take-outs, and swimming holes along the river, see this post about Wenatchee River Access Points.
Trip Description:
- After launching at Riverside Park, your first challenge will be to get under the bridge. There is a pillar to avoid. Your choices will depend on river level. At high water you can go down the right side and avoid all the large standing waves and holes which are immediately below the bridge. If you go down the left at higher flows expect large standing waves and holes. The best thing to do will be to stay way left. The pillar can be negotiated on either side at low water. If you go to the right of the pillar at low water, you will need to immediately hook left to avoid rocks. At low water the left side can be difficult also. There are two narrow slots that can be run, one near the pillar and one near the bank. Expect sweepers on river left soon after the bridge.
- The next challenge after clearing the bridge at Cashmere is Hillside Rapids at 1.75 miles. The river makes a gradual bend to the right and begins dropping. The first part of the drop is smooth, but at the bottom there are boulders and a rip rap bank on the right. At higher flows the boulders are covered, and there are some fun standing waves. You can avoid the waves if you want to, by paddling forward hard and going diagonally left. If you don’t do it just right you will eddy out in the pool on river left, so know which way to lean!
- At 2.1 miles are the Roller Coast Waves. These can be skirted on the right at higher flows. At low water you will need to run down the middle and watch out for rocks at the top. You may need to backpaddle to avoid being swamped. Immediately after the Roller Coaster Waves are a couple of places to practice eddy turns on river left.
- At 2.8 miles an old metal bridge comes into view. The channel splits. Novices should go right. The left channel has a challenging rapids called Speed Bump. At higher flows there is a huge hole here with several large waves and boulders immediately after. If you know what you are doing you may enjoy the thrill Speed Bump has to offer. The right channel, which is the way I generally recommend going, is called Rocky Reach. It is a very long rapids, but not difficult. Watch out for the boulders at the bottom. Also give the fish trap on river right a wide berth.
- At 3.5 miles you will come to another split in the river. The left channel can be run at high water, but watch out for sweepers on river left. Generally I take the right channel, as there are some great standing waves. These waves can be skirted on the left if you don’t want to run them. You may need to back-paddle if you do run the waves. There are also some good places to practice eddy turns on river right.
- There are more places with standing waves as you go on down to the bridge at Monitor. All of these waves are optional. The Monitor Bridge does not present a problem, and soon you will be approaching the Monitor County Park.
- County Park Rapids is at 4.8 miles. At all but really low flows the rocks are covered and there are great standing waves which make a fun ride. There are good places to do eddy turns on either side of the river. Shortly after the rapids you will come to the Ridge to River launch site on river left. The next three fourths of a mile is very mellow.
- At 5.3 miles a secondary channel will be seen taking off to the left at higher flows. I would not recommend it due to sweepers and a difficult re-entry into the main river. Shortly after this channel, which will be dry at low water, the river picks up speed. There are some nice standing waves going down the middle of the river. These can be easily skirted on the left. You are approaching the Big Y.
- The Big Y is a large gravel bar in the middle of the river, which splits the flow in two. The right side is known as Stair steps. The left channel is known as the Round About. This place has undergone drastic change in the past two years and will continue to change. The right channel is extremely dangerous at low flows. The left channel is pretty safe at this writing, but is challenging. A woman tuber was caught in one of many sweepers in the right channel in summer of 2007, and drowned. Many other people had close calls. If in doubt get out on the gravel bar, and look it over. You may want to carry around. Even if you have run this section before, you may want to scout, as it could be different. At the present time, I find it easy to run the right channel at high water as you can stay well away from the sweepers which are on the right bank. At low water I take the left channel. The left channel involves going down a swift smooth chute and making an abrupt right turn at the bottom. I accomplish it by turning my canoe side ways to the current as I approach the bottom of the chute, and paddle hard away from the bank
- After the Big Y the two channels re-join for a while, then split again at 6.2 miles. Ridge to River participants know this section as Three Fingers. It developed a reputation as a boat eater. Three Fingers became much easier after the floods in fall 2006 took out a large rock which had created a formidable standing wave in the past. The easiest thing to do is just to stay left through Three Fingers. For variety you may want to take one of the channels to the right if the water is high enough, but be prepared for the possibility of sweepers and log jams.
- After Three Fingers, the channels re-join into a smooth section of water. Don’t get too complacent as there is another hazard coming up. On river left a debris jam has formed against a tree. At high water this log jam is easy to avoid, but at low water the entire flow is directed into it. A tuber drowned here in 2007.
- At 6.7 miles you pass the historic Warm Springs Inn. Stay well away from the bank as there are sweepers and logs. Soon you will be within sight of the Sleepy Hollow Bridge and will have to be on your toes. The first thing to navigate is a gauntlet of boulders which turns into huge waves and holes at high water. At high water stay left, and avoid the whole thing. At low water you will need to run by the boulders on the right, or find a slot to go through, and work hard not to be pushed into a rip rap bank along the right shore. The right bank continues to be hazardous as there are logs which were placed there to enhance fish habitat. Sleepy Hollow Bridge can be passed on either side of the pillar. Give the pillar a wide berth and expect to be pushed around by huge swirls at high water.
- At 7.3 miles, there are some nice surfing waves. Soon, the river will bend to the right and then make a left turn along a rip-rap bank. This is Railroad Rapids and if you don’t actively paddle diagonally left you will be rail-roaded into some large standing waves. These can be huge above 6,000 cfs. You will need to back-paddle hard to avoid being swamped. I have never seen any rocks at Railroad Rapids, but I have encountered a sweeper along the right bank.
- At 7.8 miles the river splits. The left channel can be run at higher flows, but watch out for a corner with logs and sweepers on river left. I usually go right. The right channel splits a second time. At low water it becomes challenging. If you go left expect to go down a narrow chute and re-join the rest of the river in a swirl of squirrely currents. If you go right, you need the skill to avoid being shoved into a large boulder.
- At 8.5 miles you will see houses high on the bank. There are several places to do eddy turns behind boulders. At 9.0 miles you pass under a pipeline bridge, and a t 9.25 miles a highway bridge. A quarter mile below the highway bridge, pass under an old railroad bridge with a wood abutment: Watch out for logs that sometimes get caught on this abutment. A pedestrian bridge that is part of the Loop Trail follows immediately after the Railroad Bridge.

Photo: Paddling around the confluence of the Wenatchee and Columbia rivers
Exiting the River. There are several options for getting back to your car. The least confusing is to paddle straight on down the Wenatchee River to the Columbia, and then head upstream if you are going to Wenatchee Confluence State Park, or downstream if you are taking out at Walla Walla Point Park. If Wenatchee Confluence State Park is your destination, hug the far left bank at the Railroad Bridge which will put you into a slough system that comes out on the Columbia close to the park. If your destination is Walla Walla Point Park, take the slough on the right just before reaching the Columbia. At very low water levels getting through these sloughs can be a challenge. The distance from the highway bridge to Wenatchee Confluence State Park is approximately 1 mile. The distance to Walla Walla Point Park is approximately 1.75 miles.
Guidebooks. No published guidebook carry as much information on the Lower Wenatchee River as this website, but a nice schematic of the stretch is printed in Paddle Routes of the Inland Northwest by Rich Landers and Dan Hansen (The Mountaineers).
Fees. None at either end.
Additional Information. For a complete list of access points on the Wenatchee River, check out this information prepared by Richard and Kathy Spencer.
Trip Reporter. John Marshall. Prepared 1/7/2006 and re-written 9/02/2008.
Leave It Better Than You Found It: This should be every outdoor user’s goal. Pick up trash left by others, pull some noxious weeds along your route, throw branches over unwanted spur trails, don’t ride or walk wet trails when you’re leaving ruts/footprints deeper than ¼ inch…
Disclaimer. Treat this information as recommendations, not gospel. Conditions change and those contributing these reports are volunteers–they may make mistakes or not know all the issues affecting a route. You are responsible for yourself, your actions, and your safety. If you won’t accept that responsibility, you are prohibited from using our information.