
Five days off, a great weather forecast, an adventurous companion, and fabulous mountains near by—it makes the first challenge figuring out what we should do in this area of nearly endless possibilities.
Being inherently lazy, I defer to my partner, Mark Shipman, to finalize our plans. Last summer he had purchased the new book, North Cascades Traverses, by Bob Kandiko, and after flipping through it, had said we must do one of the featured routes. The Rainy Pass to Cascade Pass Traverse caught both our eyes.
Kandiko states at the beginning of his book that the details of featured routes are sketchy so as to preserve the sense of exploration for those who follow. So we arm ourselves with topo maps, and study what seems to be the most sensible line through these mountains. As a modern aid, however, we also load some key waypoints from the map into a GPS unit – it’s a little insurance to help us find our way should poor weather or faulty route finding confuse us once we’re out there.
Day 1 (July 28, 2011). We set off from Wenatchee , drive up the Cascade River Road out of Marblemount to deposit a shuttle vehicle at the Cascade Pass Trailhead, and then drive to Rainy Pass to start the trek. We’re not on the trail until 7 p.m. and, humorously, with all our maps and GPS take the wrong trail right out of the parking lot. We quickly realize our error and soon we’re on the correct trail to Maple Pass. At Heather Pass, we leave the official trail and drop to Lewis Lake.

This has been a big snow year and a cool summer and we find the amount of snow present in the high country mind-boggling for late July. Right away we find the snow helpful—rather than trudging through knee-jarring boulder fields on the descent, we enjoy a fun glissade. Darkness overtakes us as we work our way to Wing Lake and we establish camp by headlight well short of the lake under a stunningly clear sky that is long on stars.
Day 2. We’re moving by 7 a.m. We pass Wing Lake by and climb to the shoulder of Black Peak where we drop our large packs and walk up the south ridge to the top. Although we had hoped to also climb Corteo, our late start yesterday already has us behind schedule and we skip that side trip.


Back at our packs, we step into unknown terrain as we drop off the shoulder of Black Peak into the lovely green sloping alpine meadows and then the thickening forests flanking a tributary of Grizzly Creek. The next key destination is Fisher Pass, and our quandary is whether we should follow a simpler, lower (but probably bushy) route following creek drainages, or whether we should quickly climb out of Grizzly Creek and follow ridgelines connecting to the pass. Kandiko’s book implies they climbed Mt. Arriva and, if so, it would seem they followed a ridgeline route. The topo map, however, makes the ridges seem questionable. Worried about getting cliffed out if we go high, we settle on a staying low and seeing what the brush delivers.
“If we’re lucky, we might find a bunch of Devil’s Club”, Mark quips.
“That’s OK,” I reply, “as long as there’s no slide alder.” I loathe and fear slide alder like nothing else.
We’re at Grizzly Creek about 4 p.m., cross it, and work our way around to the Fisher Creek valley. Although biting bugs have found us in this green garden of North Cascadian loveliness, we are moving well.

In the Fisher Creek drainage, however, we come face to face with a reservoir of nefarious slide alder. It’s a mass of springy, interlaced, inch-thick branches fanning out diagonally at multiple levels that is simply impossible to push through. You must worm through the cracks and creases between branches, a task that’s triply hard with big packs.
It’s exhausting work and our pace drops to half-a- mile per hour. We’re continually searching for better options – can we move above this trap, can we cross Fisher Creek and find old-growth forests to pass through? In the end, dealing with this green hellhole seems inescapable.
For three miserable hours we crawl onward; then, with daylight fading, we look for a place to camp within these brambles. Fortune smiles on us and we hit a rare flat spot in the streambed just large enough for the tent. Minutes after the tent is up and we crawl in, I’m asleep.

Day 3. We break camp and wade back into the depressing greenery with a sense of foreboding. Travel in any direction seems improbable, and yet there’s nothing to do but repeat yesterday’s ordeal. For six hours we thrash up this horrible, gently sloping valley protecting the high country and, just as I am about to crack, we break out of the thickets into the hallowed alpine terrain of the lovely Fisher Pass.

From the pass, we work our way southwest over a ridge and drop into a large high basin. Here we can see Mt.Logan, our primary climbing goal. We work our way along the side of the large basin, trying to lose as little altitude as possible as we skirt various rock buttresses while we head toward the Douglas Glacier.

Once again, the larger-than-usual snowpack simplifies this traverse and we enjoy good travel all the way to a thin rock ridge on the divide between the North Fork of Bridge Creek and the Douglas Glacier. This perch at the 7000-feet provides a beautiful campsite and stellar views. We set up the tent, melt snow for cooking, organize gear and study the upper reaches of the Douglas Glacier for the next day’s climb.
Day 4. We awaken to overcast skies and light rain. Mt. Logan is swaddled in clouds. This could be challenging route finding – not only to the summit but to the divide we must cross between the Douglas and Fremont glaciers as we continue the traverse. Even though we had GPS coordinates, the exact slot providing the best access to the Fremont Glacier will be tricky without any visibility. There’s nothing else to do but sleep longer. We periodically check the weather, then dose off again.

At 11 a.m. the clouds start breaking. We leave camp and make our way to the summit. We drop our packs on the summit ridge only a few hundred vertical feet shy of the top and scramble to the the 9087-foot summit. We’re not there until 4 p.m. but clouds continued to swirl in and around us. For 45 minutes, we drink in the views.
Eventually we descend to our packs and work our way south along the ridge looking for a safe slot that will drop us onto the Fremont Glacier. After some false starts we find a steep finger of snow providing the connection we need. We descend the glacier then traverse toward Park Creek Pass.

It’s obvious we’re not getting to the pass by dark and national park regulations forbid camping within a half mile of the pass anyway, so we find a lovely camp on a rock outcrop far above the Thunder Creek valley that gazes across at the backside of Ripsaw Ridge, Mt. Buckner, Boston Mountain, and the immense Boston Glacier.

Day 5. After an incredible dawn with clouds filling the valley below, we traverse to Park Creek Pass, using lots of snowfields to simplify the travel. The morning snow is firm and steep, and our crampons are put to good use.

The pass is completely snow covered. We make our way around the basin underneath the Buckner Glacier and ascended a steep and narrow snow couloir to the divide between this basin and Horseshoe Basin. This couloir proves to be the most frightening part of our traverse – it is capped by the cornice of death. The cornice is huge and the day is warm, and for a half hour we are totally exposed to the hazard.

Dropping down the opposite side of Horseshoe Basin is fairly casual. It too has lots of snow for easy travel and finding an efficient route up out of Horseshoe Basin to the Glacier Camp at the top of Sahale Arm is aided by footprints of others who have come to climb Sahale Peak. We reach our national-park designated campsite at the foot of the Sahale Glacier at dusk, after more than 12 hours of travel. Surprisingly, we were the only ones here savoring the awesome night sky, a flaring sunset, and an equally stunning sunrise.


Day 6. We leisurely leave camp at 7:30 a.m. and walk down the magnificent Sahale Arm. It’s a rare August when you can glissade these slanted, open slopes right down to Cascade Pass.


From the pass, a 3.7-mile turnpike of trail drops us gently downhill to Mark’s car. From here begins the tediousness of collecting my car at Rainy Pass and completing the drive home. Naturally we convene at the Duck Brand in Winthrop for a celebratory meal, but with a few hours of driving still ahead of us, we can’t even toast our accomplishment with a beer. It’s ice tea for this trail-weary twosome.
General Notes. My principle recommendation would be to find some way to complete this traverse without going up the Fisher Creek drainage. That was pure hell. It is justifiable to be wary of low-altitude cross-country travel in the Cascades. Also, budgeting more time to this traverse would allow for more peak bagging along the way. With more days we could have run up Corteo, Arriva, Boston, Booker, Buckner, Sahale, maybe even Forbidden. Doing the route when snow still covers the heather and scree of the side slopes is also a good thing. Finally, time your visit to coincide with a good weather window. The GPS was a good aid in staying on route, but some important route decisions would be difficult without good visibility.
Climbing Gear. We opted to tackle non-technical peaks and left the rock gear behind. Our crampons and ice axes were essential. We carried and used a 30-meter, 9.2 mm rope (with prusiks and lightweight harnesses) for the glacier travel. I took a helmet, Mark did not.
Access.
- Southern End. From Highway 20 (the North Cascades Highway) at the town of Marblemount, follow the Cascade River Road, 22 miles east until it dead-ends at the trailhead for the Cascade Pass Trail (el. 3,660’).Over half the distance of this road is gravel but it is well maintained. This trailhead is in North Cascades National Park and, as of 2011, a permit was not required to park at the trailhead.
- Northern End. Leave from Rainy Pass off the North Cascades Highway (Highway 20). There’s parking on both sides of the road. Northwest Forest Pass required.
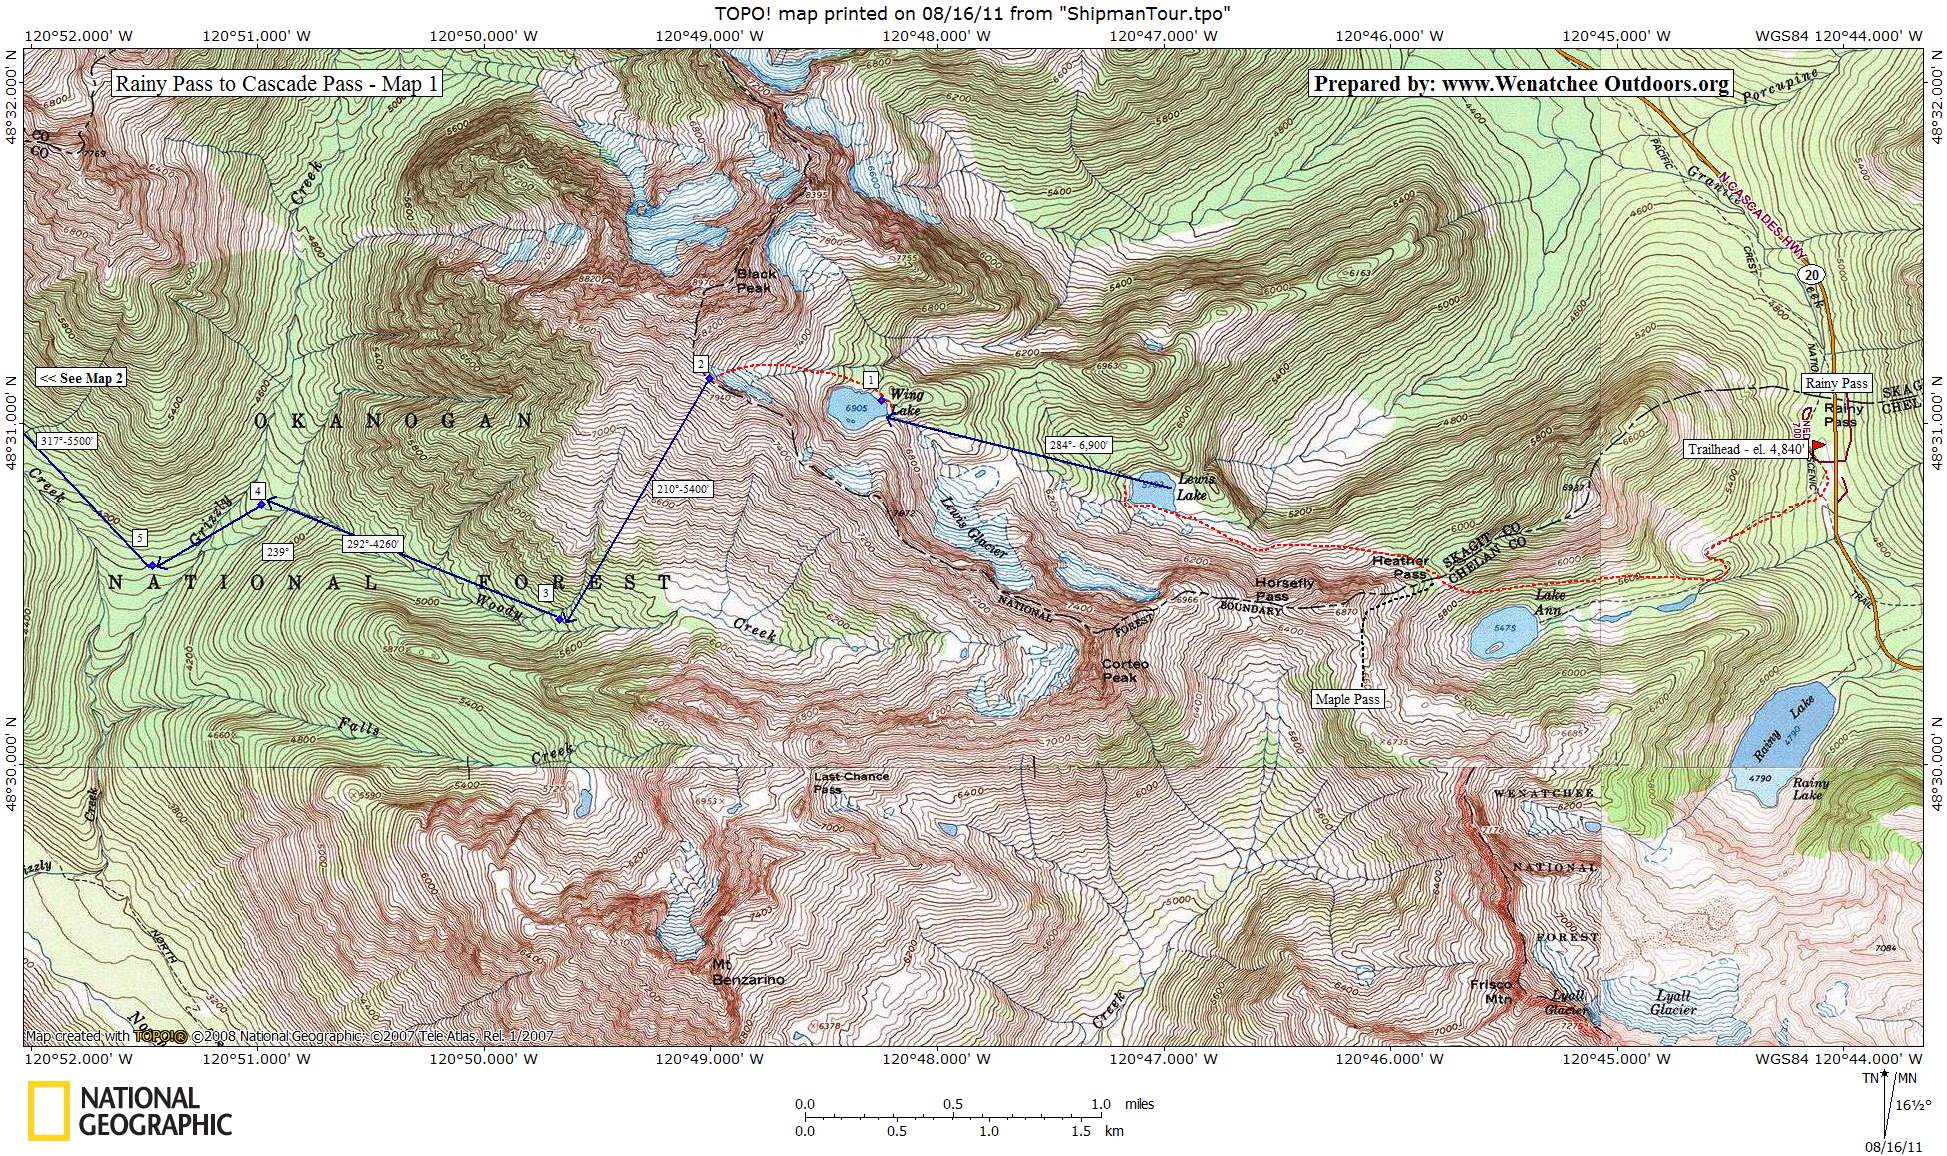
Starting the Route. From Central Washington, the shuttle makes more sense if you do the route from north to south. From Rainy Pass start on the trail to Lake Ann and Maple Pass. At 1.3 miles (el. 5400 ft), pass by the side trail descending to Lake Ann and continue on the main trail, slowly gaining altitude, until reaching Heather Pass atop a series of switchbacks after 2.25 miles (el. 6100′). At this pass, Black Peak and Lewis Lake are visible. Just below (before) the pass, there is a faint spur (unofficial) heading off through the heather. This is where you leave the official trail system. Lose several hundred feet of elevation to reach Lewis Lake. From Lewis Lake the travel is cross-country (use our maps).
Permits. Much of the trip is within the North Cascade National Park. Climbers following this route need to register with park headquarters in Marblemount. You’ll need to designate your route and goals and sign out with the park service when the trip is over. Most of ths route doesn’t have any camping restrictions, but if you camp on Sahale Arm (a popular area), you’ll need a a permit for one of the designated areas.
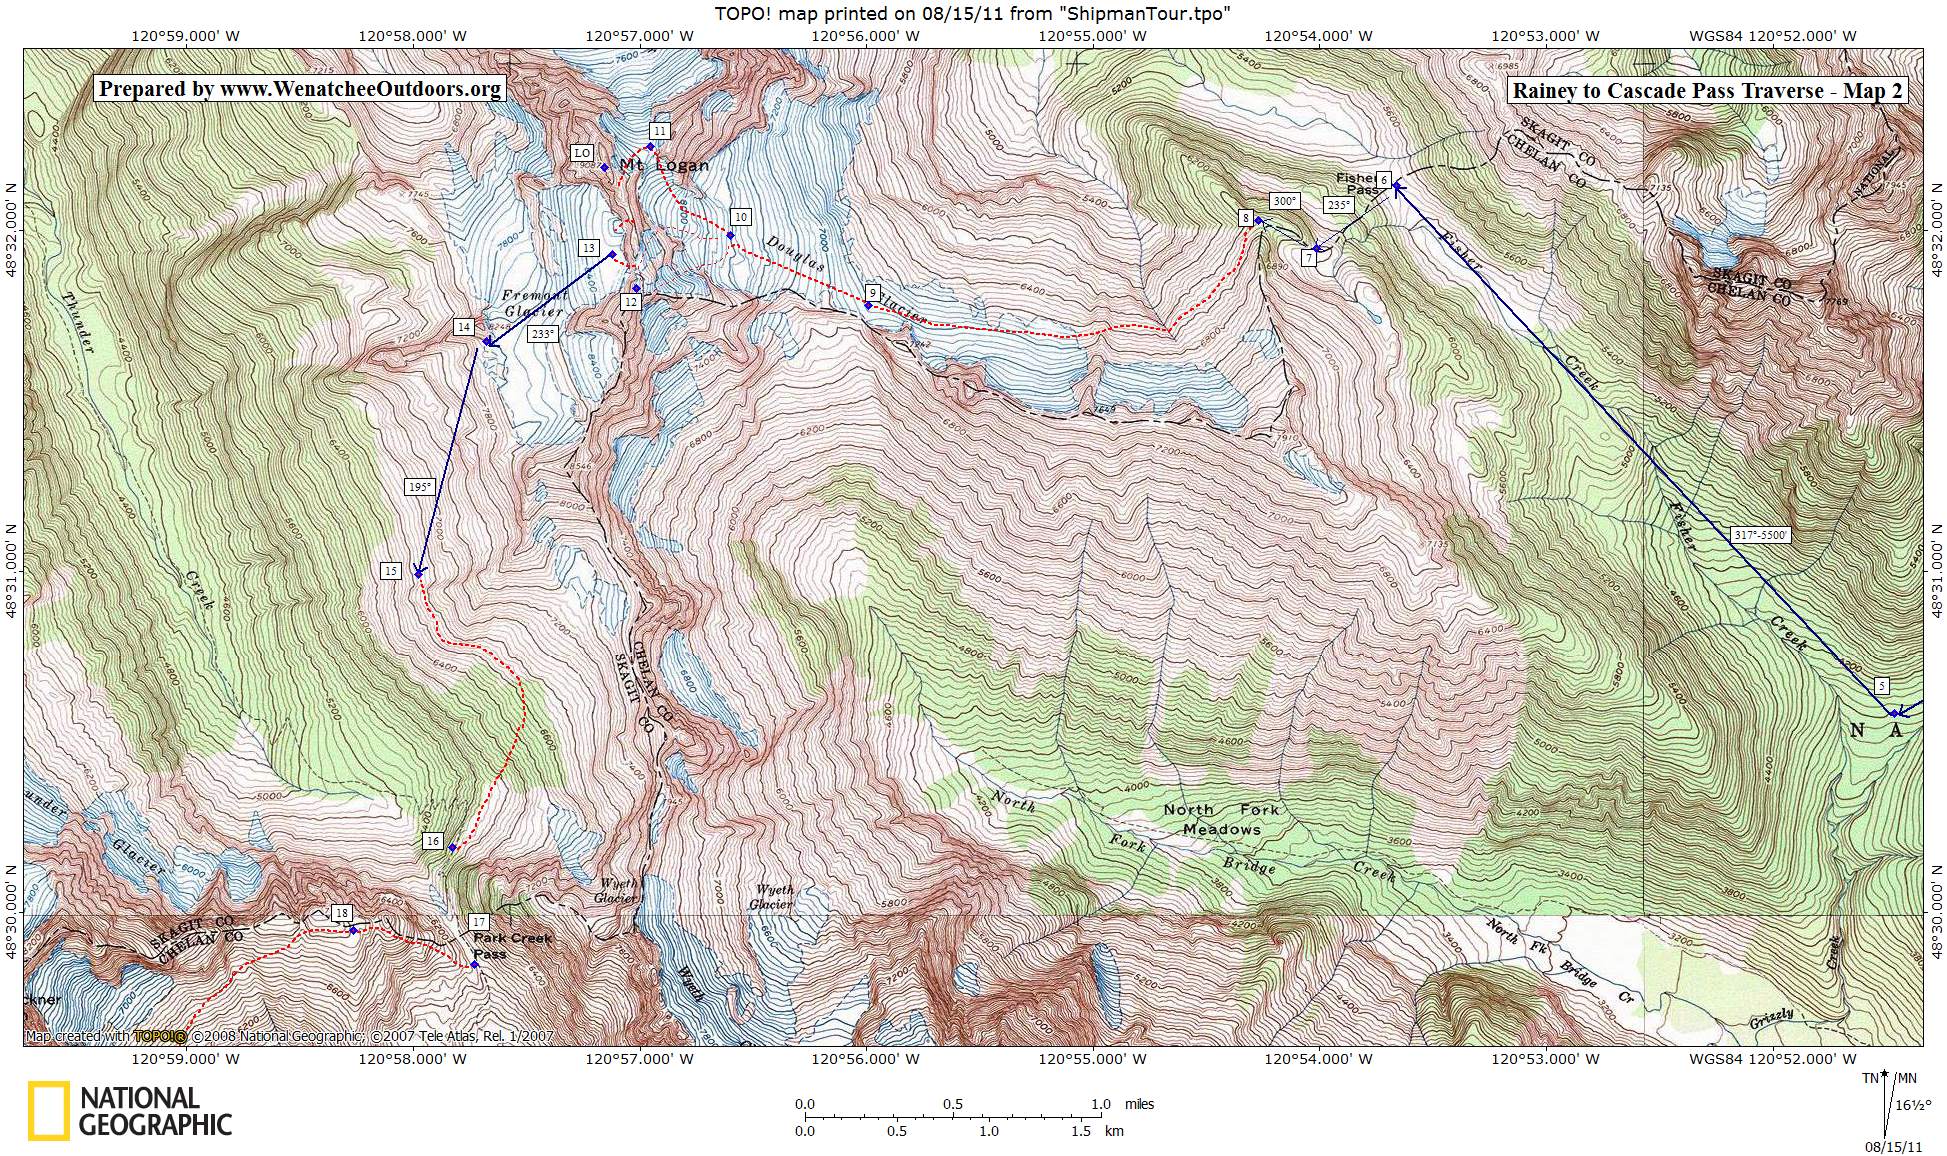
Maps See maps below for more information (topo maps from north to south).
Leave It Better Than You Found It. This should be every outdoor user’s goal. Pick up trash left by others, pull some noxious weeds along your route, throw branches over unwanted spur trails, don’t ride or walk wet trails when you’re leaving ruts/footprints deeper than ¼ inch…
Disclaimer. Treat this information as recommendations, not gospel. Conditions change, and those contributing these reports are volunteers–they may make mistakes or may not know all the issues affecting a route.You are still completely responsible for your decisions, your actions, and your safety. If you can’t live with that, you are prohibited from using our information.